Thursday, July 21, 2011

Family Numbered T-shirts

Okay, so I got this idea from a friend.  She had a family reunion a year or two ago and they made t-shirts for each person in the family.  They each got a number and their number was the order in which they entered the family (by marriage or birth).  And they took their family pictures in them.  I thought it was so cool that I wanted to do it for our reunion.

Each family got a color (which is what we did at our last reunion, so I kept them the same color), and then the numbers were brown (so we were all part of one big unit). 
It was fun to figure out every one's number. 
Something else that would have been fun (but we didn't have time because we were busy having too much fun) would be to play games and call out peoples numbers.  You get the idea...
The kids loved their shirts and in a year or son, when they have grown out of them, we hope to make a family blanket by cutting the t-shirts up into squares.

So this is how I did it.  I got every one's shirt (had to figure out every one's size, and bought them on sale half off.)  Then I figured out every one's number.  THEN, I drew out numbers onto paper until I was happy with how they looked.  Notice, my husband is number 14 and the 4 is quite small compared to the other numbers.  Oh well, just gives it character, right?
Then I cut out the numbers to use as my pattern when I cut the material.  (I used knit fabric)  Then I counted up all my numbers that I would need to cut (ex: there were 12 one's to cut out).  Then I cut them all out.  THEN, I centered every one's number on the t-shirt with pins and sewed them on.  I used thread the color of the t-shirt to help the number pop out even more.  I have to say, they turned out super cute and I am so glad I did the work (lots of work), cause it was all worth it!


Happy Crafting!

Father's Day last minute decor

For Father's Day, I really wanted to make this banner:


but alas, I was a little crafted out by the time we left, so we did a last minute throw together.  And even though I wanted it to look awesome, the guys really didn't care and thought this this was awesome! 
 Then I got the idea for their gift also on www.tipjunkie.com , but I can't seem to find it anywhere.  Basically, we put candy in a cup and made a little flag that said
"Happy Father's Day".  (We also made an "Awesome Uncle" candy cup)
I wish I could find the site, because it looked a lot classier :)
On the front of the candy cup is a Hershey's candy bar, wrapped in a tie wrapper and we had to use medical tape to secure it to the cup. 
(like I said, it was a little "on the fly" but the guys felt spoiled)

 My mom wanted to give the guys gifts wearing tiaras. 
Happy Crafting!

Happy Birthday Party for Everyone at a Reunion

At our family reunion, we decided it would be fun to have a birthday party for everyone since we are spread all over the United States and don't get to attend each others parties.  So, we did the typical things, nothing too special, but we had a blast. 
You can make a board like the one below:  Buy the board at the hobby store, paint it and either order the vinyal letters online or use your cutter to make them.

Our Family Tree Wall Hanging

We had a family reunion on my side of the family last month and I made a lot of things for it.  Here is the first one I will post about.  I wanted to give a gift to my parents for getting the reunion together and being such awesome grandparents.  So I decided to make a family tree wall hanging for them.  Each flower represents a female and the leaves are the males.  This is all I have for you, as it was unfinished when we left them.  We each signed our name on a small piece of card stock that was secured to a small ribbon to hang off the button holding each person leaf or flower. 
It was really fun to put the flowers together with my sister in laws and nieces, as we each picked out the fabric to make them with and all helped assemble them. 
I hope to get a picture sometime soon from my Mom after she has hung it in her house.
Happy Crafting!

Wednesday, May 18, 2011

Flower vase make over

I was looking for ideas for inexpensive crafty gifts to give some ladies that I was visiting and I came across this idea:


I changed my flowers a bit.  I can't find the site where I learned how to make them.  You simply cut out a circle of silk and then take a lighter and hold the flame close (but not touching) the edges of the fabric.  It will curl from the heat.  Watch out for your fingers!  Then I took a cool bead for the middle of the flower petal.

 These two vases are recycles glass bottles (ketchup and fluff jars)

This is a vase from the dollar store.  They all turned out so cute.  Oh, and the fabric...
I am shortening a long skirt that just so happened to have cool sheer fabric!  I will post a pic when that is done too!

Happy Crafting!

Saturday, May 14, 2011

Fabric covered mouse pad

I also work from home part time.  I use a black table for my desk and it has absolutely no grain for my mouse to pick up.  So, I had to figure out a way to  make a cute mouse pad, because the one we have is UGLY...
So I searched a few tutorials and they all pretty much say the same thing.  I got a piece of card board (luckily, it was already in the shape that I needed), and hot glued a piece of felt on top.  Then I got my fabric and  made sure to leave about an inch of the fabric all around the edges.  I then hot glued the bottom felt piece into place and tucked the over hanging fabric in as I went.  And that is all!  I love my new mouse pad!!!
Happy Crafting!

Fabric Business Card Holder

I needed a better way to hold my business cards than at the bottom of my purse or stuffed in my wallet getting crumpled.  I found this tutorial:
 

I love my new card holder! 
 

 On the top are my Quilts by Kista cards,
the bottom holds my Crafting with Kista cards!

Happy Crafting!

Friday, May 13, 2011

Ruffled bookmark

I have been looking for a cute bookmark for a while.  A friend of mine had a special one ruined and I wanted to make her something to replace that bookmark.  I found this wonderful tutorial:

http://go.tipjunkie.com/hm/926/funkypolkadotgiraffe.blogspot.com/2011/05/tutorial-thursday-ruffled-bookmark.html

I loved the final result so much, that I had to make a few for myself.  (I am usually reading two to three books at a time)


 I made a monkey one for my son. 
Happy Crafting!

Ruffle back pack/purse

I saw this tutorial and fell in love!  this is my summer purse:


I HIGHLY recommend making the straps wider (these were a pain to turn)  and if you want it as a backpack for yourself, I recommend making them longer as well (this size is for a child).  I think it would be an awesome diaper bag.  It is quite large, I didn't realize how large it would be from the pictures.

Happy Crafting!

Fabric Roses

I saw this tutorial and just had to make some!:


Happy Crafting!


Monday, May 9, 2011

Last name picture idea

I saw this great idea here:


and I thought it would be really cool to do the letters of our family's last name (also for a Mother's Day gift).  As I got to co-ordinating this (as most of our families are scattered throughout the U.S., I realized that I could e-mail everyone the cropped and black and white photos and we can all have one in our home!
We only did the grand kids, but families would be great too.

Happy Crafting!

Fabric flower pots

My Mother in law used to have chives in her yard that she used all the time.  This year, they didn't come back.  I saw this tutorial here:


and decided that I wanted to do this for her Mother's Day gift.  They turned out so cute, I can't wait to do my own!  I got plastic pots at walmart for super cheap.  The bottoms snap off, so it worked out perfectly with the modge podge.

Happy Crafting!

Friday, May 6, 2011

Mother's Day paper corsage

I found this tutorial here:


and wanted to make one for my Mother in Law for Mother's Day.  It is made out of scrapp book paper so she can keep it and wear it for special occaisions.  I found out her favorite colors from my Father in law and made it last night. 

I pretty much made it exactly the same way as the tutorial, but instead of having a closed center, I glued a pearl button from an old shirt in for my center piece.  Super cute, might have to make one for myself!

Happy Crafting!

Thursday, May 5, 2011

Birthday banner and gift for 'hard to shop for' Husband

Okay, the banner was not my idea, it was something our church made together and it has inspired all of my other banners as well. 
 My husband is pretty hard to shop for because it doesn't take a lot to make him happy and so I have a hard time coming up with things for birthdays and Christmas gifts.  This year I lucked out.  We have been trying to clear out the woods behind our house and he came across the perfect walking stick.  I kid you not, it was perfect!  So I decided to mark it with some of the nicknames he has gained over his lifetime and then I also marked it with things that he likes.  Like a soccer ball, basketball, a saw (he likes to build things), etc.  I borrowed some one's soldering (sp?) tool to do this.  Then I wrapped leather around the part where he would hold the stick for a comfortable grip and hot glued the ends in place.  It turned out to be a great gift and now we can't wait to go hiking together as a family!  My son has been looking for a good walking stick since then.
Happy Crafting!

Stuffed Animal Easter Baskets

Sorry this post is too little too late for Easter!  I still want post about our Easter baskets that we made.  I found three great basket ideas, but this is the one we all chose to make:

http://go.tipjunkie.com/ea/286/www.theidearoom.net/2011/02/diy-stuffed-animal-easter-baskets.html

I really wanted to do another one, but my son saw this one and started quacking, so I decided to do it too.

Here are the finished results:


                                                        Stuffed Bear basket with pink lining
 Girl duck and boy duck
                                                              My son hunting for eggs
Yum, now it is time to make egg salad sandwiches!!!

Happy Crafting!

Wednesday, April 13, 2011

Happy Easter Fabric Banner

Here is my Happy Easter Fabric Banner.  We are going to make these at the upcoming Crafting with Kista party!

Happy Crafting!

Saturday, April 9, 2011

Velcro hair pieces

I used to have these really cool hair pieces that stayed in my hair with Velcro.  I decided to make one recently and here is my finished result:

This was really easy.  I just cut out three flowers from fabric.  Each one smaller than the rest.  I grabbed some Velcro from my stash and cut it into a circle. (I am pretty sure that you can buy Velcro already shaped into a circle, but didn't go to the store to check)  I hot glued the Velcro to the back of the large flower and then hot glued the middle of each flower on top.  Only hot gluing the middle helps for the edges to stand up a little and get some dimension.
You can use both pieces of the Velcro to ensure it stays in place, but I found that just using the top prickly side of it stays in place well enough by itself for curly hair. 
Happy Crafting!

Paper Banner

So I was browsing one of my favorite blogs yesterday and came across this Easter paper banner:

I have been wanting to do something with my son's name in his room for a long time, but I wanted it to be simple and not so permanent as starching fabric to the wall.  So I decided to make this:
I found a font on Word that I really liked, Enlarged it and printed the letters out using a light gray (so it would be easy to see to cut, but not use up all of my printer ink)  Also, if you have scrap printer paper, use that.  I am going to start saving my "trash" so that I can use it for projects like this.
Then I cut out all the letters.  I went to my stash of colored card stock and then cut the letters out again using the templates I just made.  Then, I went into my stash of scrap booking paper and cut just inside the template so that when I glued to letters together, the card stock shows up a bit.  Then I got some ribbon out of my stash, and pinned it to the wall with straight pins.  I got large and small paper clips and unbent them.  I hooked the large side through the letter and the small side hangs off the ribbon.  Then I made a few loops in the ends of ribbon hanging and pinned them into place, like this:


Happy Crafting!

Saturday, April 2, 2011

Easter Egg Basket T-shirt Tutorial

Okay, this is my first Tutorial, so please be patient with me... I decided that I wanted an Easter basket with eggs and some grass for my Easter t-shirt... so I looked through my fabric and found some scraps of fabric that could pass for a basket.  Then I found some tie-died scraps that would make some great eggs.  I looked through my ribbon for something to make my basket handle and then the fake Easter basket grass.  (no, I did not use plastic grass for my shirt)

What you will need:
t-shirt
fabric scraps for the basket and eggs.  (I took mine from some fat quarters that I had in my stash)
Satin ribbon to make your basket handle
Sheer ribbon for your grass
Erasing ink fabric pen or pencil

First step was to turn the t-shirt inside out and on the front side I pinned the fabric for my basket making sure to center it.
Pin the fabric onto the t-shirt making sure not to pin it to the backside of the t-shirt (you don't want to sew it closed)
Take your erasing ink pen or pencil and draw the shape of your basket.
 Here is a closer view of my basket
 Sew on the lines of your basket that you drew, then turn the shirt right side out and this is what you have:
 Take your scissors and snip the t-shirt fabric away about a 1/8 inch from your stitching.  Be careful when you start your first cut not to cut through all of the fabric, you just want to cut the t-shirt fabric away.

 Next, do the same steps for your eggs.  Pin the fabric to the wrong side, draw your oval shape and sew around your line.  It takes a lot of patience to do ovals with the sewing machine, go slowly to avoid mistakes and misshapen ovals.  Then cut the excess fabric away from the fabric of your basket and eggs. I left about 1/4 inch excess.
 Turn your shirt right side out and cut the t-shirt fabric away from your eggs.  Once again being careful when you start your cutting not to cut the egg fabric.
 It should look something like this:
 Next braid the ribbon for the handle:
 Pin the handle onto your t-shirt and then sew into place.  I think that using stabilizer on the back of the shirt would be ideal, but I didn't.  I also only sewed the handle in a few places because I didn't want to mash it with the sewing foot.  I sewed about six places in my handle.
 Notice that we left the ends of the ribbon hanging for some extra dimension
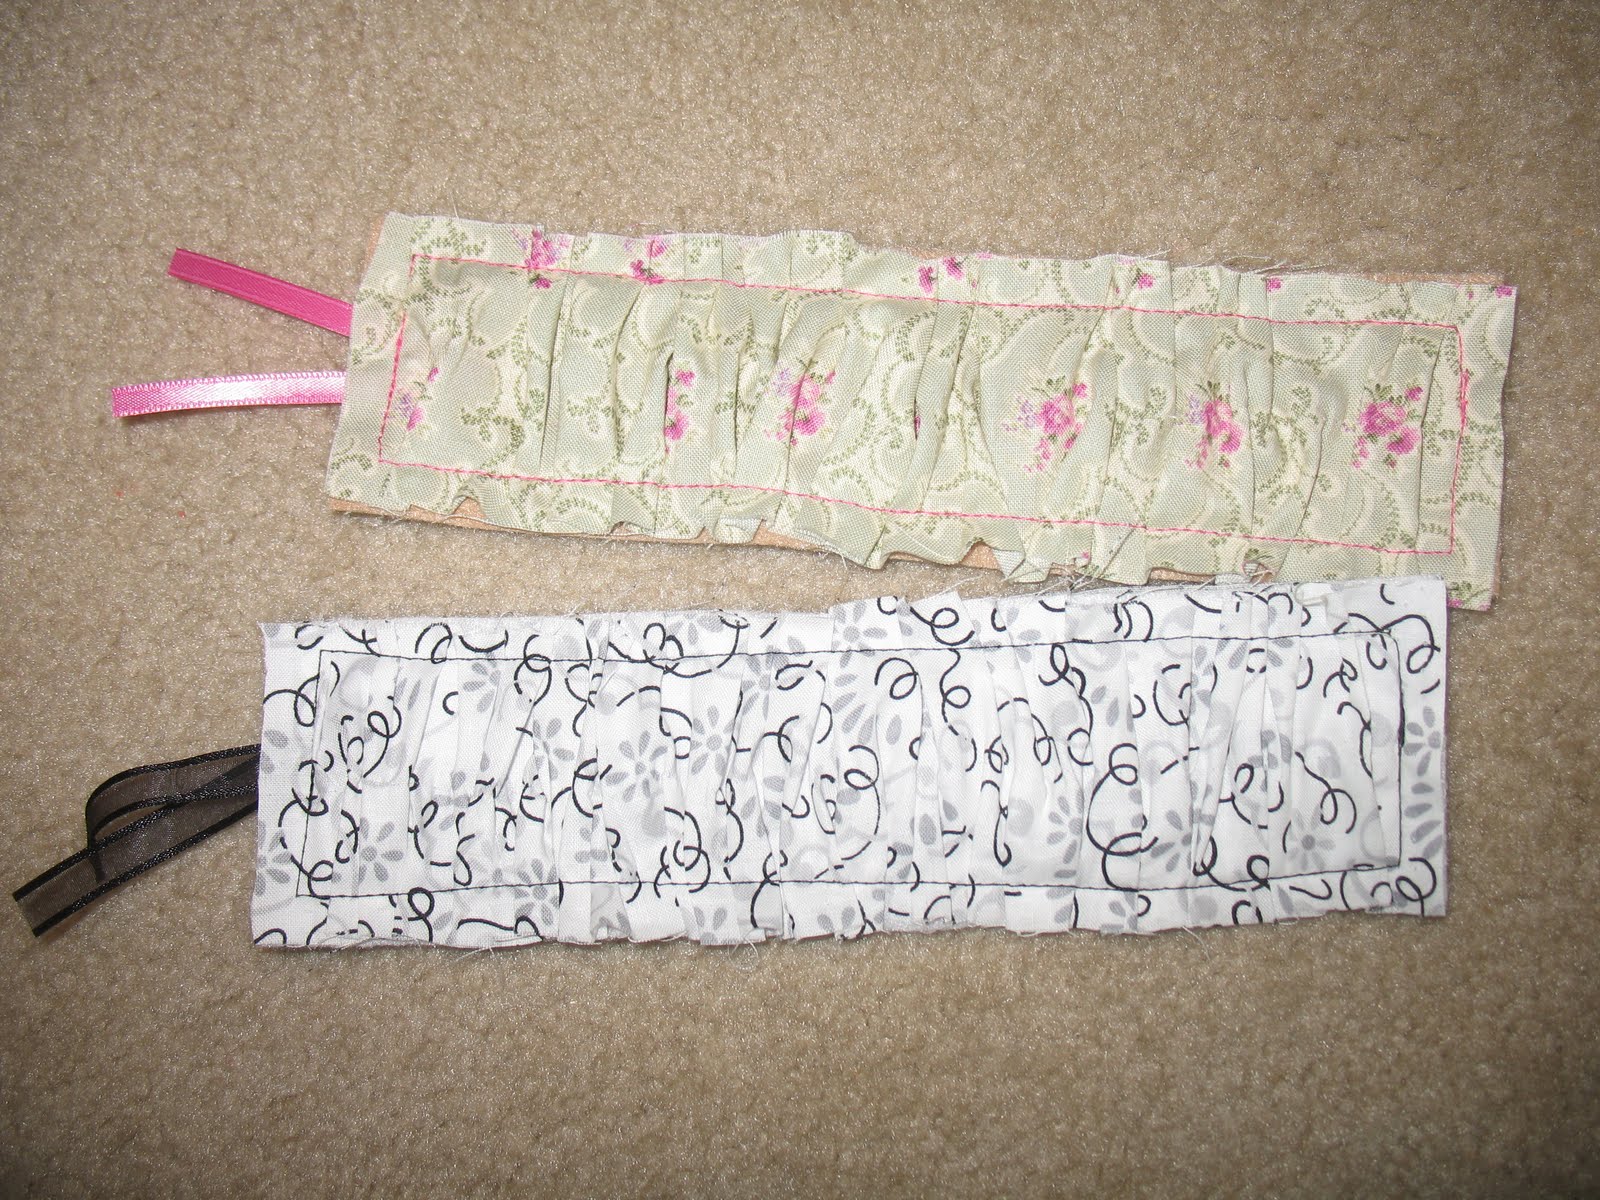
 Next you are going to make the ribbon grass.  I put my sewing machine on the largest stitch and loosed the tension and sewed a very long stretch of sheer ribbon. (I think I used half a spool)  Since my ribbon was so thin, the feet did not catch it and I had to pull it through the machine myself.  I suggest doing this slowly and making sure to keep your pulling equal to the pace of the sewing foot for the best results.  You might want to practice first on a scrap of fabric.
 Once that was done, I gave myself a good bit of slack of the sewing machine thread before snipping.  Take either the bobbin thread or the top stitch thread (after you have cut it from the sewing machine) and pull.  Start bunching up the ribbon along that thread.  I bunched it up first and then slowly moved it around until I was happy with my curl results.  Next lay it onto the basket and bunch it up.  Pin it into place until you are happy with your results.  Sew in a few places here and there until it is secure and you are happy with the look.  And you have your Easter Egg Basket T-shirt!
Happy Crafting!